If you’re not familiar with shadow photography, get ready to be amazed. This post will guide you through the basics of shadow photography, including how it differs from silhouette photography, how it enhances a photo, how to add and remove shadows in Photoshop, and some tips to keep in mind during a shadow photography session.
What Is Shadow Photography?
Let’s start by defining the terms involved in shadow photography. A shadow is the contour of an object that is formed when a light source is blocked. The shape of a shadow changes based on the object’s position and the angle, distance, and size of the light source.
Shadow photography involves manipulating the light source, controlling the exposure of the shadow to add or remove darkness from the image, and increasing the dramatic depth of a photo.

What is Light and Shadow Photography?
Light and shadow photography involves capturing the strong sources of light and the shadows they create on objects and people. It aims to create patterns, abstracts, and a combination of silhouettes.
There are no limits to the ideas you can implement in light and shadow photography. You can use natural sources of light such as the sun, or artificial lights like spotlights or streetlights. You can even experiment with harsh lighting for dramatic effects.
Your photos can be monochrome or multi-colored, depending on the mood you want to convey. Light and shadow photography allows for endless creativity, resulting in stunning images.
Shadow Photography vs. Silhouettes
While both shadow photography and silhouettes use light to create dramatic images, they are not the same thing.
Silhouette photography involves covering the object with light, making the background lighter and the object darker. The object is seen as a silhouette against the light.
On the other hand, shadows are created when the object is placed directly in front of the light source, causing the light to cluster behind or in front of the object and creating an angled duplicate.
While these techniques are different, they can be combined in a single image, resulting in breathtaking visuals.
How Do Shadows Enhance a Photo?
Expert photographers use shadows to enhance photos in various ways, depending on the subject, scene, and their creative vision. Shadows can be used as focal points or complementary details, adding contrast, dimension, composition, and a sense of balance to a photo.
Shadows also create excellent contrast in black and white photos, preventing them from looking dull. When a shadow is cast directly on the subject, it can alter its appearance, allowing the photographer to experiment with pattern, texture, and emotion.
Shadows have significant aesthetic importance and can even become the focal point of a photo on their own.
How to Add Shadow in Photoshop
Thanks to photo editing software like Photoshop, you can now add shadows to your images in a visually appealing way. The process is referred to as adding a drop shadow or cast shadow. Here is a step-by-step guide:
- Choose the subject or part of the photo where you want to add a shadow and remove it from the background by creating a new layer.
- In the “Layer Style” options, select “Drop Shadow.”
- Adjust the color of the shadow to make it realistic. Typically, shadow colors range from gray to black.
- Modify the size and softness of the shadow to match the other shadows in the image.
- Create a separate layer for the cast shadow by duplicating the drop shadow layer and distorting its shape to make it look more realistic.
- Blend the two shadows together using Gaussian Blur to soften the outcome.
- Add a gradient to create a faded look as the shadow gets further away.
- Adjust the opacity and blending modes of the shadows to achieve the desired effect.
Remember to always make sure that the edited shadows look realistic by considering factors such as the distance to the light source, the object’s proximity, and the surface’s characteristics.
To master this technique, observe and study shadows you encounter in your daily life. This will help you develop an eye for detail and creativity, essential qualities for a successful photographer.
By paying attention to your surroundings and practicing shadow photography, you can capture stunning images and bring them to life during the post-processing stage.
How to Remove Shadows in Photoshop
If you can add shadows, you can also remove them if they are unwanted or affecting the overall composition of your photo. Here are some tools in Photoshop that can help you remove shadows:
Content-Aware Fill
The Content-Aware Fill tool, particularly the Patch tool, is ideal for removing simple shadows. This tool works best when the shadow has clear lines and a well-defined background.
Clone Tool
The Clone tool allows for more precise control when removing shadows. It is effective for removing shaded sections of the face or other types of shadows.
Dodge Tool + Burn Tool
The Dodge and Burn tools are used together to darken or lighten specific areas of an image. They are based on darkroom techniques and can be useful for removing shadows by lightening the desired areas.
Tips for Light and Shadow Photography
Now that you know how to add or remove shadows in your photos, here are some additional tips to help you take stunning shadow photographs:
These tips, combined with practice and experimentation, will enhance your skills as a photographer. Remember that the best teacher is experience, so keep practicing and honing your craft. Don’t be afraid to share your ideas and learn from other photographers in the comment section below.
Colors
Incorporate transparent and translucent objects to create colored effects in shadow photography. Experiment with colored lights or cellophane paper. Be playful and use different objects to add a colorful touch to your images.
Reflections
Combine shadows with reflections to add depth and drama to your photos. Capture reflections in wet surfaces or use mirrors to create interesting compositions.
Different Source of Lights
Experiment with different light sources to create unique and captivating shadows. Don’t limit yourself to natural light – explore artificial lights like studio lighting to create additional sources of light indoors.
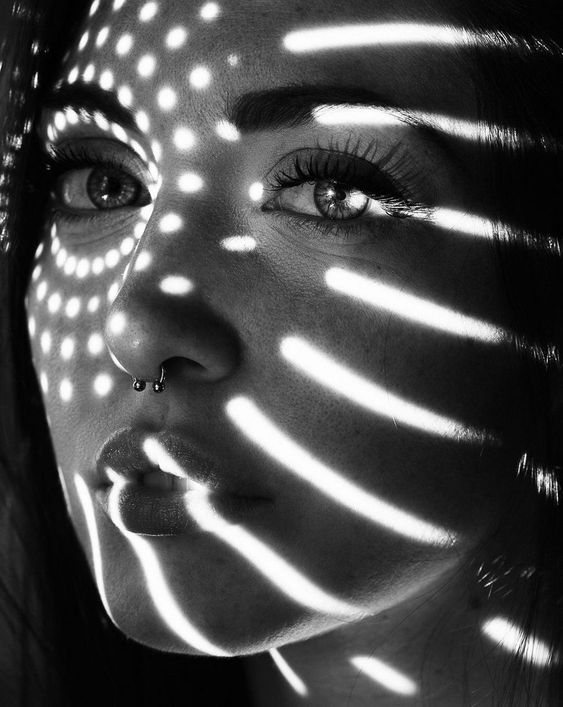
Patterns
Look for patterns created by existing objects or create your own patterns using various materials. Shadows of windows, stair railings, or window blinds can add interesting visual elements to your photos.
Harsh Lighting
Embrace harsh lighting conditions to create dramatic shadows. The intensity of the light and the contrast it creates can result in stunning images. Sunsets are particularly ideal for capturing dramatic shadows.
Are you excited for your next photoshoot?
Now that you understand the importance of shadows in changing the mood and impact of your photos, get out there and start practicing. Pay attention to the shadows you encounter in your everyday life and let them inspire your next photoshoot.
Remember, practice makes perfect. Keep observing, learning, and experimenting, and your shadow photography skills will continue to grow. Enjoy the process and keep capturing breathtaking images.